Showing posts with label Recipes. Show all posts

Sunday, March 10, 2013

Corned Beef Sinigang! Your Feast for St. Patrick's Day


 St. Patrick's day is just around the corner. Yet another reason to drink beer, wear green and eat corned beef. Although when I did my research, people from Ireland don't really eat corned beef and cabbage. Wiki notes that it just became popular in the US after Irish immigrants ate corned beef instead of pork. Probably it's cheaper back then but because of that, corned beef is always associated with St. Patrick's day

Corned beef is a salt cured beef product which is marinated in different spices. It is one of my favorite dishes when I was growing up. My understanding of corned beef was always the canned meat that you fry with onions, tomatoes and potatoes served with garlic rice and topped with egg. I eat that for breakfast at least once a week back home. When I came here in the US, that's really when I tried the real thing which is totally different. No comment on which one I prefer.

The first time I've eaten Corned Beef Sinigang was back in the Philippines in this restaurant called Sentro 1771 (Check their menu and see what other amazing food they are coming up with). You can say it inspired me to make this dish. I didn't really know what to expect but when I tasted it, it works. Sinigang is a tamarind based soup and usually uses pork or shrimp. The sour component works well with the salty taste of the corned beef. The chili added that extra kick that will make you want to stuff more rice in your mouth.


Here's what you need:


  • 2-3 lbs. of Corned beef. (Got mine from Trader Joes)
  • 1 Cabbage (cut in quarters then halved)
  • 1 lb. of Green beans/Haricots verts
  • 3 Roma Tomatoes (quartered)
  • 1 medium Onion (quartered)
  • 3 Chili Peppers such as Jalapeno or Serrano
  • 1 package of Sinigang mix (I used Sinigang with Taro/Gabi but you can use any) Found at your Asian Supermarket
  • 1 tbsp. of Fish sauce

 1. First, cut the beef into 2 inch cubes.


2. In a large pot, boil the meat in 4 cups of water or until all meat is submerged. Add onions and tomatoes. You don't really have to be particular when chopping the onions and tomatoes since it will be really soft and we will strain the soup later anyways. We just want the flavor of it for the broth.

3. Simmer for about 2 hours. Once the meat is tender, add the Sinigang soup mix and simmer for another 15 minutes.


4. Transfer the meat into the serving dish (We are not done yet we just want to separate the meat and the veggies so that it's easy to mix in the pot). Put the cabbage first and cook for 5 minutes. Take it out and arrange together with the meat. Then cook your green beans for 2 minutes. Take it out and transfer to your serving dish. Add a little bit of water to the pot if needed. Add fish sauce to your liking. Strain the sauce and pour over your serving dish. Serve with rice.


Tips: To properly enjoy this, it's best served with steamed rice and a fish sauce. Spoon over some of the soup over the rice and drizzle some fish sauce over the meat and the rice.

If you are planning to store some of it, it's better to separate the soup from the meat and veggies so that the veggies won't be over cooked when reheating. Microwave the meat and soup then just add the veggies.

Wednesday, December 5, 2012

One Pot Dinner: Kale, Tofu and Sausage


It's Winter time or probably just Fall. Whatever season it is, when December comes you'll see a lot of greens at the market. Whether it's collard greens or kale, it becomes part of our diet during this holiday season. I adapted this recipe here:  http://savorysweetlife.com/2012/05/kale-mabo-tofu/. It looked good so I decided to try it and give my own interpretation of it. I added some porkyness to the dish by browning some Italian sausage. I think it worked well. You can probably substitute it with the sausage of your choice. Maybe Longganisa?

I think this is a pretty basic and simple recipe. It's all about just cooking the tofu and sausage and mixing them all together with kale. The only tip I would give is that when you brown the sausage, there is a time where you don't want to touch it so that it devlops that crispy caramel flavor. I would say leave it for 3 minutes on medium heat without touching it that way there would be those crispy parts.

Ingredients:


·       2 tbsp. vegetable/olive oil

·       1 tbsp. minced ginger

·       1 tbsp. minced garlic

·       1 tsp. red chili flakes (optional)

·       half of a medium red onion, diced

·       1 pound Italian Pork sausage

·       1 package firm tofu, cut in 3/4-inch cubes

·       2 tbsp. oyster flavor sauce

·       1 tbsp. soy sauce

·       1 cup chicken broth

·       4 cups baby kale leaves (chopped)

·       2 tbsp. chopped scallions/green onions


Instructions:

1.     Add 1 tbsp. vegetable oil to a large skillet heat on medium heat. Add sausage and cook until browned. (Make sure to remove the casing of the sausage and break it down while cooking it. I also leave it about 2-3 minutes without touching it so that there will be some crispy parts – The best part J). Set aside

2.      Cook Tofu. What I did was to bake it until crispy. 400 degrees for 30 minutes, flipping it halfway through. You can also fry it if you want. Set aside.
  
3.      Using the same pan where you cooked the sausage, heat it on medium heat and add remaining oil. Add ginger and garlic and sauté for about a minute, just enough to soften the garlic and for it to be aromatic. Add chili flakes and onions. Sauté for about 5 minutes until onions are soft.

4.       Add Pork, mix. Add Tofu, mix well. 

5.       Add soy sauce and oyster sauce. Mix and cook for about 2 minutes.

6.       Stir in the chicken broth. 

7.      When the broth begins to bubble in a light simmer, add the kale. You may want to add kale in batches so your pan is not crowded.

8.      Once, wilted. Turn off heat. Serve with steamed rice, brown rice or quinoa. I did mine with Red quinoa! Garnish with scallions J


Tuesday, November 20, 2012

Golden Summer cocktail


I know I know, Summer is over. But who cares? We can still feel and taste Summer even if it's fall right? This drink lets you taste the freshness of the basil and lemon while honey gives its golden SF color! I think you can enjoy this drink all year round. As long as you have the ingredients plus the right mood you are set. 


Nice to meet you Jack


I based this recipe from a whiskey sour which is lemon juice, simple syrup plus your favorite whiskey. Since I have a Basil plant I decided to add it for freshness then I used honey instead of simple syrup since I was lazy to make one. I think the honey gives a great golden color. The only thing I recommend you to do is to stir the honey and lemon juice first so that the honey will thin out a bit then add the whiskey, ice and basil leaves. You also want to shake it about 20 seconds on your cocktail shaker just until your hands get cold. Since honey is sticky you want to really shake that thing like you mean it.


Liquid Gold


Slicing the lemon: I got this tip on a cooking demo at Jack London Square. If you don't have a lemon squeezer and you want to get less seeds, when you squeeze the lemon, don't cut the lemon in the middle. Most seeds are in the middle so if you cut it on the sides, you'll get less. Sometimes you'll still get some seeds but it will be easier to get rid off if you do it this way.


Another tip I got just by observing the bartenders is to slap your herbs before garnishing it. So before putting a basil leaf as a garnish, slap it just to release the aroma and drop it on your cocktail.


There you go! This is my first cocktail post! I know my blog is all about food and bites but sometimes you just need a good cocktail to enjoy your food and tickle those tastebuds. Try it out and tell me what you think. I almost got tempted to add a couple slices of jalapeno before shaking it to give it a good kick. Maybe you should try it?


Monday, February 13, 2012

Arroz Caldo - Perfect for the rainy weather!


Arroz Caldo also known as the Filipino rice porridge is my go to dish on a rainy night or day or just  for any occasion you want. I crave for this especially when I have colds which is usually once a month. If your parents want you to eat chicken noodle soup when your sick then this is the Filipino take on it.


This is a very simple recipe that involves the basic ingredients when cooking Filipino food. It has garlic, ginger, fish sauce and soy sauce. I fried some sliced garlic to top it together with some chopped chives. You can also add boiled eggs but I didn't add it on this recipe since I feel like there's so much chicken happening with the drumstick and stock. Crunchy Pork skin chicharrones would be a great topping too for that crunchy texture.

Here's what you need:

(L-R) shallots, ginger, chives, sliced garlic for frying and minced garlic

Most ingredients of this recipe are from Trader Joes. 


1 medium shallot minced
1 tbsp. minced garlic
2 tbsp. sliced ginger
6 pcs. Chicken drumstick
32 oz./ 4 cups Chicken stock
1 1/2 cups of Jasmine rice (rinsed)
1 tbsp. fish sauce
1 tbsp. soy sauce
4-5 cloves of garlic, sliced thin then fried until crispy (optional)
bunch of chopped chives


Here's how you do it:

1. Pat dry the chicken drumsticks with a paper towel. Season the chicken with salt and pepper. Put a little olive oil on a large pot on medium to high heat and fry the chickens until brown. This will take about 10 minutes. Make sure the oil is hot before putting the chicken. Oil might splatter so be careful. Set aside on a plate.


2. Using the same pot, fry the garlic, shallots and ginger for about 3 minutes on medium heat. Make sure to scrape those brown bits on the pot from the chicken. That's some great flavor! :)

3. Add the rice and mix for about 2 minutes to absorb the flavors. Add the chicken stock and bring to a boil.


4. Once boiling, place the chicken back to the pot with all the drippings from the plate. Let it simmer for about 30 minutes. What I usually do is to cover the pot for about 15 minutes. Then simmer it uncovered making sure to mix it every once in a while so that the rice won't stick at the bottom. On the 20 minute mark, add 2 cups of water and mix. Add another cup of water until the desired texture is thick but soupy like a rice porridge. I added a total of 4 cups on mine.


5. Add fish sauce and soy sauce. Mix. Salt and pepper to taste.

6. To serve it, put the rice porridge in a bowl, top it off with chopped chives and fried garlic. You can even add some chicharon. Squeeze some lemon before serving. Enjoy!


This is a great make ahead recipe that will last 3-5 days refrigerated on an air tight container. When reheating, microwave the chicken and the porridge separately. Put some porridge in a bowl and add about 2 tbsp. of water. Microwave on high for 1 minute and 30 seconds. Mix it well, put the chicken on a plate and microwave for a minute. Put the chicken and the porridge together and add your toppings.

Any variations/suggestions? Please comment below. I'd love to hear them! :)

Sunday, January 22, 2012

Almond Leche Flan


First post for 2012

Leche Flan is a popular Filipino dessert which you'll probably catch on every Filipino gathering together with the normal Lumpias and Pancit. I've made Leche Flan before using vanilla extract but this time I'm using almond extract just for a different flavor combination. This recipe is from the book "The Filipino-American Kitchen" which I got this year, thanks to the wifey! I guess she's saying that I'll cook more so she can eat and taste it! :) My future recipe posts will probably be inspired by this book. That's the direction I'm going to anyways. I wanna cook more Filipino food using local and seasonal ingredients as much as possible but still have that Filipino flavor that I'm used to.


Flan is a perfect party dessert since it's best made in advance. The flavor develops more once you refrigerate it for about a day. If you are making this for a party, it's best to make it the night before. I used a combination of a mini loaf bread pans and ramekins. It depends on how you want to serve it but if you want a personal flan then use a ramekin.

Makes 6 servings (4 oz. ramekins)

For the caramel:

Melt 1 cup of granulated sugar on a saucepan over medium heat. It takes about 10 minutes to melt. Make sure stir and break any sugar that builds up. Place on ramekins and make sure the bottom is evenly coated. Cool completely.

For the Flan:

1 12 oz. can of evaporated milk
1/2 cup of sweet condensed milk
6 large egg yolks
1/2 cup half and half
1/2 teaspoon of almond extract (If you want a stronger almond flavor use 1 tsp.)


1. Preheat oven to 350F.
2. Combine eggs, evaporated and condensed milk, half and half and almond extract on a large mixing bowl. Whisk until incorporated.
3. Strain mixture to individual ramekins with the cooled caramel.
4. Place ramekins inside a large baking dish and pour hot water inside until it reaches halfway up the sides of the ramekins.
5. Loosely cover the baking dish with foil and bake for 1 hr.
6. Take out the baking dish and check if the surface is set and it jiggles slightly when you tap the ramekins. If not, bake for another 15 minutes. (Mine took about 1 hour and 15 minutes total).
7. Let it cool for 15 minutes then wrap it with foil and put in the fridge overnight.
8. To serve: run a knife around the ramekin to separate the flan from the mold. Place ramekins in individual plates and invert it to the plate. Tap a few times to make sure that bottom releases the flan. Pour any excess caramel into the flan and the plate.
9. Enjoy! :)

Wednesday, December 28, 2011

Christmas Goose


It's my first time to cook this kind of bird. I heard good things about Geese and its glorious fat content. A lot of skin means a lot of FAT! :) For Christmas, I cooked my 10 pound goose based on Gordon Ramsay's recipe. His recipe is really simple. All you need is some Chinese five spice, some lemons and an orange. The citrus helps cut through the fat and the Chinese five spice creates this holiday aroma that will make your house smell like Christmas.

Here's the video:


Here's the recipe from Gordon Ramsay. I added some thyme to boost the flavor. Also, don't forget to take out those pinion feathers. Use tweezers to take them out.

Ingredients:

10lb goose
2 tbsp. chinese five spice
1 tbsp. salt
zest of two large lemons and 1 orange
1 tbsp. of chopped thyme and a few sprigs to stuff the bird

1. Zest the lemons and orange. Using the mortar and pestle, mix in the zest, Chinese five spice, salt and thyme.
2. Check the inside of the bird and remove any giblets or pads of fat. Using the tip of a sharp knife, lightly score the breast and leg skin in a criss-cross pattern. This helps the fat to render down more quickly during roasting.
3. Rub the spice mixture all over the bird. Cut the the lemons and oranges in half and put them inside the cavity. Add a few sprigs of thyme inside. Let it marinate overnight.

Preheat oven to 475 degrees F

4. Put the bird in a shallow roasting pan. Roast for 15 minutes to brown the skin.
5. Lower the temperature to 350 degrees F.
6. Roast for about 1 hour and 15 minutes. (Estimated time for roasting is 10 minutes per pound). Since this bird is about 10 pounds, Total roasting  time after browning is 1 hour and 45 minutes. Check the internal temperature of the goose and it should register at 140 degrees at this point.
7. Drizzle about 1 cup of honey all over the bird. Roast for another 30 minutes. Internal temperature of the bird should read about 160-165 degrees.
8. Take the goose out of the oven and let it rest for 30 minutes covered in foil before carving.
9. Strain all the goose fat collected and store it on an airtight container. You can use it to cook your potatoes, veggies, etc.


Now I can say that I've cooked and eaten my first goose this Christmas. I'm happy with the way it turned out. It's like duck but better and more fatty. The skin is the best part. I'm looking forward to the next goose roast!

Saturday, September 17, 2011

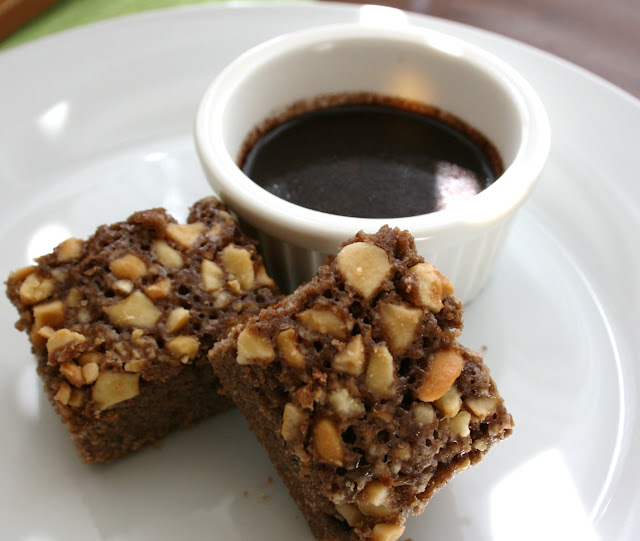
Tablea Brownies


I was intrigued when I found this recipe online. Back home, we always have hot chocolate made with tablea for New Year's Eve. It's also used to make chocolate rice porridge, also known as Champorado. It's a popular Filipino breakfast enjoyed especially when it's raining. Check my other recipe on this blog for Quinoa Champorado! :)


Tablea brownies is another great way to enjoy this chocolate. It is very light compared to the fudgy brownies you usually have. It's great paired with a scoop of vanilla ice cream just like a "pizookie" from BJ's. Also, you can make a chocolate sauce with tablea so you can dip the brownies in it if you want more chocolate goodness!

Here's how to make it:


What you need:

2 sticks of butter (1 cup)
1 cup of chopped chocolate tablea (about 8 tablets). Can be found at your nearest Asian supermarket..
2 cups of sugar
1 3/4 cup flour
1 tsp. salt
7 large eggs
1/2 cup of chopped nuts (I used cashew)


  1. Preheat oven to 350 degrees F
  2. Melt butter and chocolate in a small sauce pan. It's better to melt the butter first. Cut the stick of butter into 4 before putting it in the saucepan so that it would be easier to melt. Once butter and chocolate are incorporated and there are no lumps, turn off heat and let cool, about 10 minutes.

3. In a large bowl, whisk flour, sugar and salt.
4. Transfer cooled chocolate  into a large bowl and whisk the eggs.
5. Fold the flour mixture into the chocolate mixture. Don't over mix.

6. Transfer to a 2 8x8 inch pans. Sprinkle nuts over it.

7. Bake for 30 minutes. To check if it's done, use the toothpick method. Place toothpick in the middle of the brownie and pull it. It's done when there's no chocolate coming out with the toothpick

8. Let cool for about 15 minutes before slicing it into squares


Choco sauce:

2 tablea
1/2 cup sugar
1/2 cup water

Mix the ingredients in a sauce pan over low heat, about 10 minutes. Dip the brownies and Enjoy!


Storage: Put in airtight container. It will last for 5 days at room temperature. No need to refrigerate.

Tuesday, September 6, 2011

Java Rice

As a Filipino, rice is always part of my meal. Whether it's for breakfast, lunch, snack or even dessert. Rice is a must have in every Filipino household. It's probably because almost all Filipino dishes are stew and soup based and it only makes sense to have rice to absorb all that great flavor.


Now let's talk about BBQ. Usually, it is paired with mashed potatoes, corn, and some bread. Where I grew up, it's always paired with Java rice. Java rice is a perfect compliment to Filipino style BBQ. The BBQ marinade is usually ketchup and soy sauce based. Those two ingredients are also what we use to make Java rice.


To make it, Mix 1/4 cup of soy sauce and 1/4 cup of ketchup in a small bowl. Saute 1 tbsp of garlic with 1 tbsp of butter in a large pan until fragrant. Add 2 cups of cooked rice, preferably refrigerated rice.Mix for about 2-3 minutes until garlic is mixed. Add the sauce and mix for about 5 minutes until rice is mixed well with the sauce. Top it with some chopped green onions and serve with your favorite BBQ. Don't forget your vinegar to dip your BBQ! :)

Filipino style Pork BBQ with Java rice. Perfect match

Thursday, August 25, 2011

S'mores bites


S'mores is a classic American treat. It's the trinity of gooey toasted marshmallow, melted chocolate and crunchy graham cracker. This recipe is probably the easiest dessert to make. No handheld mixer or torch needed! The only challenge with this is making sure all the graham crackers fit in the baking sheet.

There are only a few ingredients needed to make this so make sure you are using the best and highest quality out there.

Here's what you need:

about 16 graham crackers
1 stick (1/2 cup) sweet cream butter
1/2 cup brown sugar
1/4 tsp. vanilla extract
pinch of salt
approximately 4 cups of mini marshmallows
1 1/4 cups mixture of chocolate chips ( I used 1 cup choco chip and 1/4 white chocolate)


  1. Preheat oven to 350 degrees.


2.  Line baking sheet with 2 overlapping sheets of foil. Arrange graham crackers tightly on a single layer. Cut the crackers into 2 to fill up the edges. Set aside.

3. Melt butter and brown sugar over medium heat. Bring to a boil while stirring occasionally. Add a pinch of salt. Mix until sugar is dissolved, about 7 minutes. Remove from heat and slowly add vanilla extract. It will sizzle a little bit so don't worry.


4. Spoon the caramel mixture over the graham crackers evenly. Sprinkle marshmallows on a single layer and bake for about 8 minutes until they are puffed and starting to brown.


5. Remove from the oven and sprinkle your chocolates. Let it melt over the marshmallows for about 5 minutes. Run a toothpick over them to create a pattern. Bring out your artistic side!  Let it rest for 20 minutes until the chocolates are set.

6. Cover baking sheet with foil and freeze for about a hour. Remove the slab from the sheet and transfer to a cutting board. Cut into 2 inch squares and refrigerate. It should last about 4-5 days on your fridge


7. Enjoy it chilled!